Mac OS 9 Emulation On My Apple M1 Mac Mini (UTM)
Why?
Good question. Because I can? In reality, a few old games and an occasional need to run some older Adobe software was at the root of it. I'm happy to report that the small handful of old games DO actually run. I should note that all these games were released pre-OS X era. UTM does not provide any graphics acceleration at this time - so most graphic intense games are not gonna run on it.
Why am I blogging it? Well, it was a little tricky to set up and required a LOT of Googling. And I may need to go through the process again, so a handy step-by-step outline of what I did to succeed seems like a good idea.
Specs
- Mac Mini (9,1), M1 2020 - 8 GB RAM, 250 GB HD
- Mac OS Big Sur (11.5.2)
- UTM 2.2.4
Setting Up UTM Hard Drive
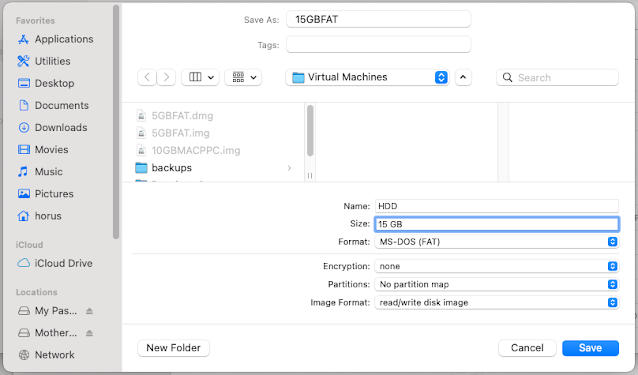
The first thing I discovered is the default qcow2 drive format UTM uses wouldn't work for me. I *did* see others report they used it with no problem... but no matter what I tried it wouldn't work. I found a work around by creating a .img disk file and importing it. It was a 2 step process.
Disk Utility
Command Line hdiutil
**UPDATE** This step can be skipped. As long as you have not used Encryption, simply change the .dmg extension to .img and it works fine!
Open a terminal window in the directory you saved the .dmg file in. You're going to use hdiutil to convert .dmg to .img format. To do that enter the command (substituting the actual filename of your file where it says "filename"):
$ hdiutil convert filename.dmg - format UDRW -o filename.img
It will write a new file that can be imported into UTM as a Hard Drive for your client installation. I toss the .dmg when done because I now have an .img I can import it to any number of clients.
Setting Up UTM
Start up UTM. You'll see a floating window that includes any client installs you have already listed on the left, and a Welcome to UTM window with 4 "buttons" taking up the rest of the application window. Start by clicking in the "Create a New Virtual Machine" button area.
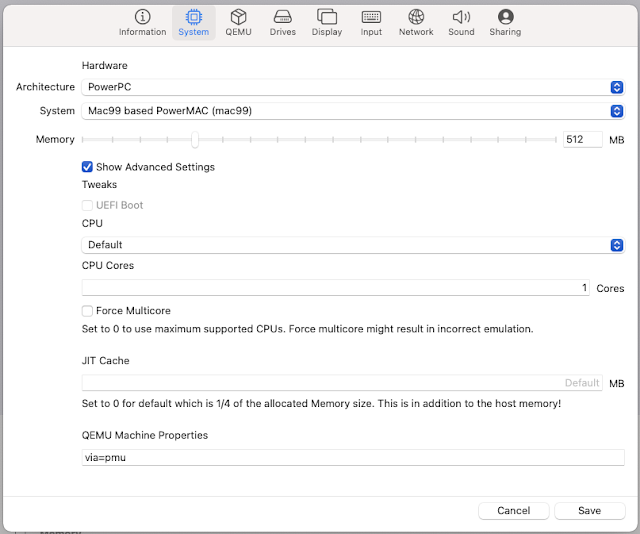
- Select "PowerPC" from the Architecture pop-up menu
- Select "Mac99 based PowerMAC (mac99) from the System pop-up menu
- Adjust Memory to the desired RAM for the client machine (note - this will be dedicated to your 'virtual' computer while the client is running and will NOT be available to anything else you might be doing on your M1 Mac)
- Click the "Show Advanced Settings" check box
- I left the CPU at "Default" which reads as a 900 Mhz G4 processor in the client System Profiler
- Put 1 for CPU Cores. I have not tried experimenting with more than 1 core yet. I do know there were dual core PowerPC systems released back in the day. It is possible adding cores may be useful?! I'll experiment and update with my results. **UPDATE** the mac99 selection limits the client to 1 core
- I left the JIT Cache and QEMU Machine Properties untouched (via=pmu should already be in the QEMU field when you opened the advanced options)
I did not mess with the "QEMU" tab icon from the top of the screen. Drives is the next tab you need to edit.
When you first come to this screen, you will not have any drives listed. Here you will import your .img file and create your CD/DVD removable drive. My first gripe with UTM starts here. There is no way as of v. 2.2.4 to store your drive file anywhere except on the main hard drive of your Mac Mini. The drive image is packaged into the UTM file stored in your ~/library folder. This is one of two things I'd REALLY like to see changed/added to UTM. These Mini's don't come with a lot of HD storage built in. I have several TB of storage on external drives, and if UTM could allow me to use that space, I'd be doing WAY more experimenting with machine clients.
Anyway, the first think to do is click the "Import Drive" button. Navigate to the .img file you prepared and click the Open button. This could take a while depending on how large of a drive you made since it is copying the drive into the UTM "Package".
When that has completed you'll want to add the CD/DVD Removable drive. To do that, click on the "New Drive" button. Click on the "Removable" check box and then click "Create".
Moving right along to the Display tab, make sure the Emulated Display Card is set to VGA. Also, uncheck the Fit To Screen box if it is selected. This particular item causes me no end to headaches. There seems to be some glitches when changing screen resolutions within the client. I have problems sometimes no matter how this is set, but MOST of the time un-checking the Fit To Screen option gives me the best results.
I don't mess with the Input" tab (though I will note there is "Invert Mouse Scroll" check box option which flat out doesn't make a bit of difference in the client machines... any of them. I hope some day they fix it!)
I also did NOT make any changes on the "Network" tab but include this image to show you what works on my system. Yes, Mac OS 9 has internet (though no modern browsers that really utilize it).
Finally*, the "Sound" tab. This should be set as pictured for you already. Sound is a bit odd. So far, when I'm booted up in Mac OS 9.2.1 sound seems to be perfect. Works as expected. But booting up in Mac OS X, it is garbage. Broken and chopped up. Based on my reading, this is an issue with Screamer specifically. I have not dug deeper yet to see if there is a solution. I'll try to update if I find one.
** UPDATE** I found a major glitch with the Screamer sound profile. I added a 3rd party "docking station" with an additional headphone jack. IF I am using that audio output rather than the one on my M1 mini, and try to launch ANYTHING in UTM with the Screamer sound card configuration, I get a kernel panic and UTM crashes.
* I skipped the "Sharing" tab because without SPICE Guest agent tools, I don't think clipboard or Shared Directory is useable. Once you've completed your installs, you may want to go turn on USB sharing in order to access any USB devices you might want to use in the client. But to start, I leave it turned off.
Finally, click the "Save" button at the bottom of the window to write those setting to the machine.
Installing Mac OS 9
You will need an ISO file of the Mac OS you are trying to install. At the bottom of this article, I'm including several useful links, one of which is a site called WinWorld. They specialize in "abandon-ware". I also happen to own an OS 9 install disk or two (three actually) and figured it was easier to just download an ISO than try and find my external CD/DVD drive to plug in to make one.
I will be installing BOTH OS 9 and OS 10.4 onto the same image. For this to work, OS 9 has to be first in order to get the boot drivers on that allow it to start up in either environment.
First thing you need to do is right click over your Machine listed on the left side of the UTM application window. Select "Edit" from the pop up menu. This will bring up the multi-tabbed screen we used to set up your Client originally. Select the "Drives" tab at the top. You will need to change the boot order so that the CD/DVD is listed first. I've outlined those arrows in the image below.
**UPDATE** I was able to boot with the blank disk image as 1st in the boot order while the OS 9 disk was "loaded" into the CD/DVD "Drive" this time. My first experimental installation, this did not work. So you might be able to skip this step.
**2nd UPDATE** This really is the fussy step! Four out of five times It has installed with the "CD/DVD Drive" 2nd (NOT first) in the boot order list. I need to test more and figure out why 1 out of 5 times it HAD to be first.
In order to install OS 9, you need to boot from the installation CD iso file so the CD/DVD should be first on the list. Save your changes.
In order to "load the disk into the drive", (left) click on your machine name in the list on the left. At the bottom, center you will find a "CD/DVD" pop up menu. Click on it and you will get a "Browse" option. Navigate to wherever you've stored your Mac OS 9 install disk iso file.
You'll get an OpenBIOS screen with some strings of text. It may take a minute or two, but it should change and show you are booting from the CD. Once booted up, go to the Utilities folder on the install CD. You're looking to launch Drive Setup in order to format your drive for installing and booting Mac OS 9.
I'm going to gloss quickly through this as it is a pretty standard procedure. I'm providing a set of pictures showing you the options I selected.
 |
| Select the unmounted Volume |
 |
| Click Customize Setup |
 |
| Select 1 Partition and Mac OS Extended |
 |
| Initialize the drive |
You should now have the drive "untitled" mounted on your desktop. There is just one more step before quitting Drive Setup and beginning the installation. Go to "Functions" in the menu bar and select Update Driver. This should make sure the boot flags are set on this drive for starting up OS 9 once the install completes.
Before we go farther, I nearly forgot to mention the UTM buttons along the top toolbar of the windowed Client. You are going to need to know how to capture and release your mouse and keyboard in order to interact inside or outside of the client.
There is a small icon that looks like a pointer arrow with a sunburst around it. Click on that to capture your mouse in the client. The default release for the mouse is a keyboard short cut. Press both <CONTROL> and <OPTION> on the LEFTHAND side of the keyboard to release the mouse back to your computer.
Mac OS 9 in UTM/QEMU is unable to switch between host and client seamlessly. You will be capturing and releasing the mouse a lot if you are moving back and forth between. Mac OS X (so far) seems to switch easier between host and client.
I'm not going to walk you through the installation process. It is pretty straightforward. Finish your install following the prompts on screen.
Before you restart, there is one more item you should install from the OS 9 disk. Aladdin's Stuffit Expander. In this era, zip files were NOT a Mac thing. Everything you will find online that runs on OS 9 is likely to be stuffed with Stuffit. You'll need it to uncompress the installers you will want to use to add software.
On the OS 9.2.1 disk, there is a folder called "Aladdin Software" tucked into the "Software Installers" folder. Open it up and run the installer.
You can poke around and see if there is anything else you want to install from the disk. Back in the day, I'd have installed a few other items, but since I won't be using this like I did when it was the cutting edge OS... I will skip the rest.
Time To Restart
The first thing you need to do is go the the Control Panels tucked into the Apple Menu. Double click on "Startup Disk" and set your start up disk to your hard drive. This sets the flag and "blesses" the system folder on your hard drive.
"Restart" is broken. 99.9% of the time it will not work. Still, to move forward, you have to restart. At this point for me, the screen goes black and it gets stuck there. Give it about 60 seconds (just in case there is still hard drive activity going on in the background). Use the (LEFT) <CONTROL><OPTION> keys to release your mouse. Then click the "Power Button" circle on the UTM toolbar to shut the system down. Ignore the warning and do it anyway.
If you previously changed your drive boot order, right-click on your machine from the UTM list on the left and select Edit. Go to the Drives tab and rearrange your drives so that the Hard Drive .img file is first on the list and the CD/DVD is last. Save the configuration and re-launch the client.
You should now be launching into your fresh install! You'll have to go through some set-up stuff. Region, time, name, etc. Configure it how you want it. Congratulations! You're running Mac OS 9.
Glitches
Yup. There are some fussy things. As I mentioned before, "Restart" basically doesn't work.
There are also some screen resolution switching issues. You'll notice in the screen shot below, I've made an alias of the "Monitors" control panel and placed it just above and to the left of center. Whenever I come out of certain games (like Sid Meier's Alpha Centauri), the game dumps me zoomed into the middle of the desktop with no access to anything on the top/bottom/left/right of the screen. Without access to the menu bar at the top or the control strip at the bottom there is no way to get to the Control Panels or Restart/Shut Down options in the menu. Dropping an alias of the Monitors Control Panel right there allows me to recover from the screen resolution issue.
CD/DVD Drive Error AND How To Backup Your Fresh Install
This section covers two "fixes". The first is how to backup your disk image once you have the perfect base installation (so you don't have to go through this again if you mess up your system). The other fits into a fix for a specific glitch I discovered.
The Glitch
You'll be chugging along using your client and suddenly you start getting an error every time you try to "load" a CD image. You'll get a UTM error window that says "Device 'drive0' is not removable". Doesn't matter what you do; restart the client, restart UTM, remove and re-add the CD/DVD drive... NOTHING fixes it. Here is how you fix it (I had it happen on a Windows 98SE client as well so not limited to Mac client):
1. Make a backup copy of your hard drive image from the UTM "package" file.
2. Remove ALL drives from the Drive Tab of your client configuration screen.
3. Save and close the machine configuration (DO NOT import your drive without saving and closing first)
4. Re-open / edit your client configuration. Go to your Drive Tab and FIRST, use the Import button to import the backup you made of your hard drive file. SECOND, add the CD/DVD (Removable) drive just like you did when you first set it up.
5. Save and close the configuration.
Finally, launch your client and the drive is fixed!
 |
| Right click on the client in the machine list. Select Show in Finder |
 |
| On the "machine package" with the correct name for the one you are trying to back up, right click and select Show Package Contents. |
 |
| Open the images folder in the window that pops up when you show package contents. |
 |
| There is your Hard Drive img file. Copy it to a new location (for me on an external hard drive). |
Useful Links
Finally, here is a lit of links I found useful. Primarily as sources for old abandonware software, but also general informations links.
UTM download for MacOS
Emaculation - Forum for most things Mac OS Emulation. UTM is barely on their radar, but they do have a lot of QEMU info to read.
WinWorld - A library of abandonware (mostly) OS's. A good source for iso install disks.
Macintosh Repository - A visual hot mess from the 90's (by design I'm sure, but DON'T let that put you off!) Probably my single go-to source for old software for this project. You'll have to join to download anything. I recommend donating a small amount to keep it going.
My Abandonware - a large library of abandonware (mostly) games for multiple platforms.
PowerPC Archive - Downloads for older versions of software
PowerPC Software Archive - A collection of the last version(s) of select software to run on PPC architecture.
Next Up...
I hope to write about my OS X 10.4 Tiger installation (as a continuation of this post so it should be shorter) as well as my Windows 98SE installation.


Comments
Post a Comment